概述
通常SATA盘的性能比较低,对于大多数应用来说性能不够,但纯SSD的盘又比较昂贵,结合这两种盘的使用策略是业内讨论的一个热点,也有很多成熟的方案来使用。
之前有文章讨论过cache策略,我们这里选择通用的flashcache方案来用SSD盘加速SATA盘。
flashcache
源码:https://github.com/facebookarchive/flashcache
参考:http://www.yangguanjun.com/2018/01/30/lvm-with-cache/
Ubuntu上安装
测试使用的是”Ubuntu 16.04.2 LTS”,它的内核比较新,所以这里编译安装flashcache很方便。
系统信息
1 | # lsb_release -a |
编译安装
1 | # apt install -y git make gcc |
CentOS上安装
测试使用的是”CentOS Linux release 7.3.1611”,它的内核比较旧,在安装flashcache时遇到很多问题。
系统信息
1 | # lsb_release -a |
编译安装
1 | # yum install -y git make gcc |
网上可搜索到该问题:https://github.com/facebookarchive/flashcache/issues/191
升级内核
尝试升级CentOS的内核版本,但是编译flashcache还是一样的错误。
1 | # yum update |
无奈,选择升级CentOS内核到最新版本4.15。
参考:http://www.jiagoumi.com/work/1167.html
1 | 先导入elrepo的key,然后安装elrepo的yum源: |
1 | # uname -r |
很无语,最新kernel的4.15版本竟然也编译不过flashcache。
查看之前编译安装flashcache成功的Ubuntu平台上的内核版本为:4.4.0-62-generic,最后决定尝试 4.4的kernel版本,步骤与上面的步骤类似,差别如下:
1 | 重新升级系统内核,选择kernel-lt* |
再尝试编译安装flashcache,一切正常O(∩_∩)O哈哈~
1 | # cd flashcache |
flashcache使用
硬盘信息
1 | # fdisk -l | grep dev |
这里使用三块盘:vdb、vdc、vdd。
其中vdb、vdc是容量型磁盘,vdd是性能型磁盘,实验用vdd通过bcache加速vdb和vdc。
使用步骤
与flashcache相关的命令好几个,如下:
1 | # flashcache_create |
另外flashcache是通过device mapper来做的设备映射和缓存,所以对flashcache device的操作命令也有dmsetup,使用如下:
1 | # dmsetup |
磁盘规划
因为flashcache要求一个ssd_device对应一个sata_device,所以在使用之前,我们要规划好哪些SSD盘做缓存?哪些SATA盘需要做flashcache?以便给出合理规划。
这里我们有一个SSD盘,两个SATA盘,所以把SSD盘分为两个分区。
1 | # fdisk /dev/vdd |
缓存模式
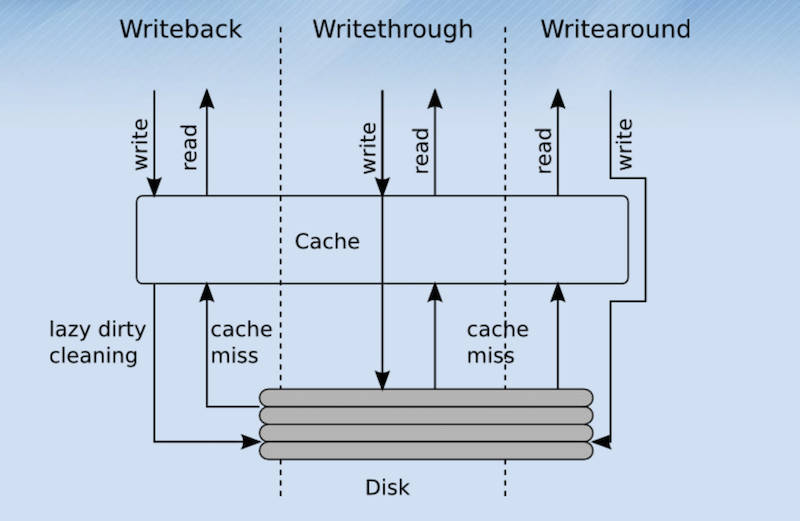
flashcache支持三种缓存模式:
- Writeback : 对于写入,首先会写入到Cache中,同时将对于block的元数据dirty bit,但是并不会立即写入后备的device
- Writethrough : 对于写入,写入到Cache中,同时也会将数据写入backing device,知道写完backing device,才算写完
- Writearound : 写入的时候,绕过Cache,直接写入backing device,即SSD只当读缓存
三种缓存模式的区别如下图:
创建flashcache device
1 | 后端设备为一分区: |
查看flashcache device
1 | # ll /dev/mapper/fcache-dev* |
使用flashcache device
创建后的flashcache device可以像普通device一样使用,如下:
1 | # mkfs.ext4 /dev/mapper/fcache-dev1 |
查看flashcache device的flashcache状态
在使用一段时间后,我们可以看flashcache的缓存状态如下,可以以此为依据来调整flashcache的策略。
1 | # dmsetup status fcache-dev1 |
查看flashcache device相关信息
1 | # ls /proc/flashcache/vdd1+vdb1/ |
sysctl查看flashcache的信息:
1 | # sysctl -a | grep flashcache |
不明确上述参数是否可以动态调整?
删除flashcache device
1 | # dmsetup info /dev/dm-0 |
遇到的问题
删除设备出错
测试中在remove一个device mapper设备时,报“Device or resource busy”。
1 | # dmsetup remove /dev/dm-1 |
尝试remove --force参数:
1 | # dmsetup remove /dev/dm-1 --force |
之后尝试很多命令,没法完全把该设备移除,只能重启,重启后一切正常。
创建设备出错1
创建flashcache device时报错:“Valid Flashcache already exists on…”。
1 | # flashcache_create -p back fcache-dev1 /dev/vdd1 /dev/vdb1 |
这个出错比较明确,按照提示先销毁cache设备中的flashcache数据即可。
1 | # flashcache_destroy /dev/vdd1 |
创建设备出错2
测试中反复操作,创建flashcache device时报错:“Device or resource busy”。
1 | # flashcache_create -p back fcache-dev2 /dev/vdd2 /dev/vdc |
尝试销毁flashcache设备上的相关数据,之后创建还是报错:
1 | # flashcache_destroy /dev/vdd2 |
再重启机器后,创建flashcache就正常了,比较奇怪 ;(
重启机器后设备消失
重启机器后,看不到之前创建的flashcache device。
这是因为flashcache重启后不会自动加载设备,需要手动执行命令:
1 | # modprobe flashcache |
若想flashcache和设备在机器重启后自动加载,可以把相关命令加入“/etc/rc.d/rc.local”。
/etc/rc.d/init.d/里也添加服务也是一个好方法 ;)