Ceph RBD Mirroring实践

一、需求

当我们有多个Ceph集群时,若一个Ceph集群的RBD Images非常重要,需要寻求灾备的方案,那你就可以选择Ceph RBD Mirroring这个原生方案。

Ceph 从 Jewel版本里就引入了RBD的Mirroring机制,可以配置Pool或Image级别的跨集群异步复制,本文中重点介绍RBD Image的备份方案和步骤,其他类型的备份方案与之雷同,可参考实现。

二、原理

Ceph RBD Mirroring的官方文档:http://docs.ceph.com/docs/master/rbd/rbd-mirroring/

可参考的文档:https://www.zybuluo.com/zphj1987/note/328708

架构图

两个Ceph集群RBD Mirroring的架构图如下:

rbd mirror arch

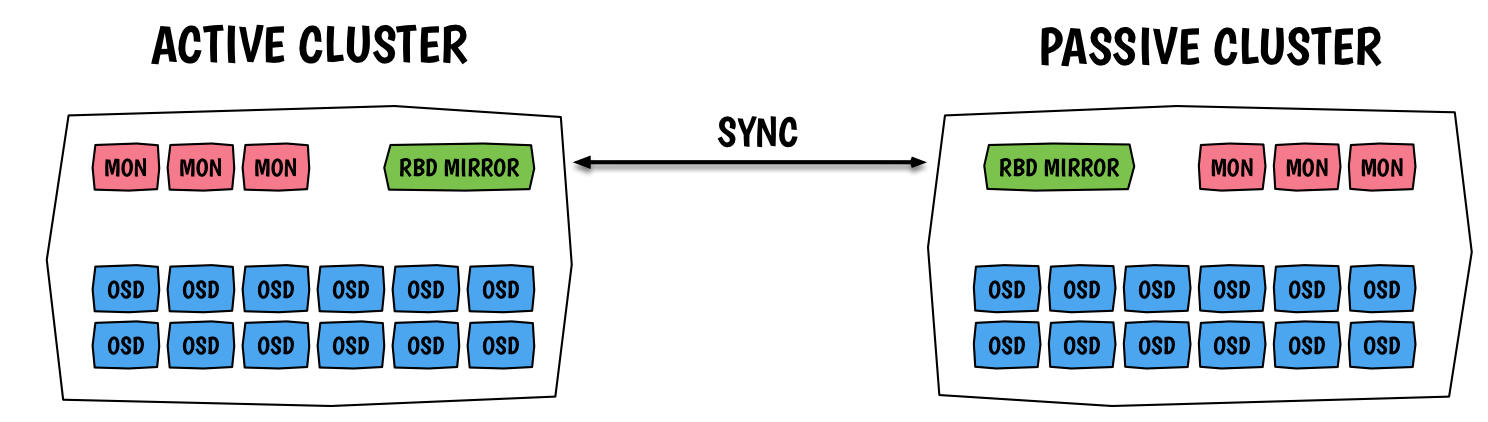
针对RBD Mirroring,我们需要明确的点有:

  1. RBD Mirroring是异步备份机制
  2. 每个Ceph Cluster需要启动一个 rbd-mirror 的daemon(Ceph Luminous+版本可以启多个!)
  3. RBD Mirroring可以配置为两种:Pool级别 或 Image级别
  4. RBD Mirroring中两个Ceph集群的pool名字必须相同
  5. RBD Mirroring的每个配置是单向同步的,也只需要一个RBD MIRROR的daemon即可
  6. 两边都启动 rbd-mirror 的daemon,可以配置两个Ceph Cluster的双向同步
  7. 同步的方向确定后,主 Image可mount后读写,从 Image是只读的,mount会失败

The RBD Mirroring 依赖两个新的rbd的属性

  • journaling: 启动后会记录image的事件
  • mirroring: 明确告诉 rbd-mirror 需要复制这个镜像

IO Path

RBD Mirroring的IO 流程大致如下:

rbd mirror iopath

  1. IO通过librbd写入RBD Image的journal里(每个Image都有自己的journal)
  2. 写入journal后,返回ack给client
  3. IO写入RBD Image
  4. 远端的rbd-mirror daemon拉取image journal的内容,并回放到image中

从上面的第4步可以看出,我们如果要配置一个 Ceph Cluster A → B 的 RBD Image mirroring的话,需要在 Ceph Cluster B端启动一个 rbd-mirror daemon!

三、集群同步实践

Ceph官网上的RBD Mirroring文档写的比较简单,不适合初学者去参考实践,推荐参考RedHat上的相关文档:

https://access.redhat.com/documentation/en-us/red_hat_ceph_storage/3/html/block_device_guide/block_device_mirroring

集群信息

使用我们线上的两个Ceph Cluster来实践,集群信息如下:

Ceph Cluster A:

  • 缩写:clusterA
  • Ceph Version:Mimic 13.2.6
  • auth:开启认证

Ceph Cluster B:

  • 缩写:clusterB
  • Ceph Version:Mimic 13.2.5
  • auth:开启认证

基于上面的描述,这里分如下几种场景来实践RBD MIRROR

1、单向的RBD Image级别

1> 配置同步

如上两个Ceph集群,我们配置 A → B 的RBD Image级别的同步,步骤如下:

1) Ceph Cluster B,安装rbd-mirror

1
2
>> clusterB
[root@clusterB-node1 ceph]# yum install rbd-mirror-13.2.5

注释:这里按照与Ceph版本一致的rbd mirror

2) Ceph Cluster B,指定Cluster name

1
2
3
4
>> clusterB
[root@clusterB-node1 ceph]# vim /etc/sysconfig/ceph
...
CLUSTER=ceph

注释:本步可以省略,如果指定CLUSTER=,若该机器上有ceph其他daemon,它们的重启会报错,因为默认ceph其他daemon的CLUSTER=ceph

3)Ceph Cluster A & B,创建RBD Mirror使用的认证user

1
2
3
4
5
>> clusterA
[root@clusterA-node1 ceph]# ceph auth get-or-create client.clusterA mon 'profile rbd' osd 'profile rbd' -o /etc/ceph/ceph.client.clusterA.keyring

>> clusterB
[root@clusterB-node1 ceph]# ceph auth get-or-create client.clusterB mon 'profile rbd' osd 'profile rbd' -o /etc/ceph/ceph.client.clusterB.keyring

注意:如果要用到多个pools,尽量auth里不指定pools

4)Ceph Cluster B,拷贝Ceph Cluster A的配置文件和认证keyring

1
2
3
4
>> clusterB
[root@clusterB-node1 ceph]# ln -s ceph.conf clusterB.conf << 若实践的ceph集群名称使用默认的ceph,这一步可不做!
[root@clusterB-node1 ceph]# scp <user>@<clusterA_mon-host-name>:/etc/ceph/ceph.conf /etc/ceph/clusterA.conf
[root@clusterB-node1 ceph]# scp <user>@<clusterA_mon-host-name>:/etc/ceph/ceph.client.clusterA.keyring /etc/ceph/

5)Ceph Cluster B,配置并启动rbd-mirror的daemon

1
2
3
4
5
6
7
8
>> clusterB
[root@clusterB-node1 ceph]# systemctl enable ceph-rbd-mirror.target
[root@clusterB-node1 ceph]# systemctl enable ceph-rbd-mirror@clusterB
[root@clusterB-node1 ceph]# systemctl start ceph-rbd-mirror@clusterB

检查service和log文件:
[root@clusterB-node1 ceph]# systemctl status ceph-rbd-mirror@clusterB
[root@clusterB-node1 ceph]# vim /var/log/ceph/clusterB-client.clusterB.log

6)Ceph Cluster A,配置RBD MIRROR的模式,这里指定使用pool(kube)和模式(image):

1
2
3
4
5
6
7
8
9
10
11
12
>> clusterA
[root@clusterA-node1 ceph]# rbd mirror pool enable kube image
[root@clusterA-node1 ceph]# rbd mirror pool info kube
Mode: image
Peers: none


>> clusterB
[root@clusterB-node1 ceph]# rbd mirror pool enable kube image
[root@clusterB-node1 ceph]# rbd mirror pool info kube
Mode: image
Peers: none

7)Ceph Cluster B,添加RBD MIRROR的peer节点,指定使用的client user:

1
2
3
4
5
6
7
8
9
10
11
>> clusterB
[root@clusterB-node1 ceph]# rbd --cluster ceph mirror pool peer add kube client.clusterA@clusterA -n client.clusterB
e2db5280-ab04-43e6-8a27-90598c13fc8b


检查配置:
[root@clusterB-node1 ceph]# rbd mirror pool info kube
Mode: image
Peers:
UUID NAME CLIENT
e2db5280-ab04-43e6-8a27-90598c13fc8b clusterA client.clusterA

8)Ceph Cluster A,使能指定image的RBD MIRROR:

1
2
3
4
5
6
7
8
9
10
11
12
13
14
15
16
17
18
19
20
21
22
23
24
>> clusterA,rbd mirror支持image journal使用其他pool(通常配置为高速介质),如下为可选配置:--journal-pool kube-ssd
[root@clusterA-node1 ceph]# rbd feature enable kube/rbdmirror journaling [--journal-pool kube-ssd]


[root@clusterA-node1 ceph]# rbd mirror image enable kube/rbdmirror
Mirroring enabled


检查配置:
[root@clusterA-node1 ceph]# rbd info kube/rbdmirror
rbd image 'rbdmirror':
size 20 GiB in 5120 objects
order 22 (4 MiB objects)
id: 1041166b8b4567
block_name_prefix: rbd_data.1041166b8b4567
format: 2
features: layering, exclusive-lock, journaling
op_features:
flags:
create_timestamp: Mon Jun 24 14:38:13 2019
journal: 1041166b8b4567
mirroring state: enabled
mirroring global id: ac8ae112-cd5c-4e75-abed-248a388f1da9
mirroring primary: true

9)Ceph Cluster B,检查image的RBD MIRROR状态:

1
2
3
4
5
6
7
>> clusterB
[root@clusterB-node1 ceph]# rbd mirror image status kube/rbdmirror
rbdmirror:
global_id: ac8ae112-cd5c-4e75-abed-248a388f1da9
state: up+replaying
description: replaying, master_position=[object_number=3, tag_tid=1, entry_tid=3], mirror_position=[object_number=3, tag_tid=1, entry_tid=3], entries_behind_master=0
last_update: 2019-06-24 15:00:38

2> 取消同步

执行下面命令即可:

1
2
3
>> clusterA
[root@clusterA-node1 ceph]# rbd mirror image disable kube/rbdmirror
Mirroring disabled

上述命令会把备份Ceph Cluster中的image删除。

1
2
3
>> clusterB
[root@clusterB-node1 ceph]# rbd info kube/rbdmirror
rbd: error opening image rbdmirror: (2) No such file or directory

3> 主备切换(failover)

1)Ceph Cluster A,降级主的image

1
2
[root@clusterA-node1 ceph]# rbd mirror image demote kube/rbdmirror
Image demoted to non-primary

2)Ceph Cluster B,升级从的image

1
2
[root@clusterB-node1 ceph]# rbd mirror image promote kube/rbdmirror
Image promoted to primary

若没法成功执行1)步骤,该步需要加选项:--force

3)Ceph Cluster B,检查image的状态为:primary

1
2
3
4
5
6
[root@clusterB-node1 ceph]# rbd mirror image status kube/rbdmirror
rbdmirror:
global_id: df0e8825-1e0a-4559-8a72-6ab30a957366
state: up+stopped
description: local image is primary
last_update: 2019-06-26 10:48:12

4)Ceph Cluster A,检查image mirror的状态为:up+replaying

1
2
3
4
5
6
[root@clusterA-node1 ceph]# rbd mirror image status kube/rbdmirror
rbdmirror:
global_id: df0e8825-1e0a-4559-8a72-6ab30a957366
state: up+replaying
description: replaying, master_position=[object_number=0, tag_tid=10, entry_tid=0], mirror_position=[object_number=3, tag_tid=5, entry_tid=3], entries_behind_master=1
last_update: 2019-06-26 10:49:47

注释:该步依赖 Ceph Cluster A上启动 rbd-mirror,并添加了pool的peer

4> 主备切回(failback)

该步依赖 Ceph Cluster A上启动 rbd-mirror,并添加了pool的peer!

若Ceph Cluster A之前出问题,做了非正常的failover,failback之前需做如下操作:

  • Ceph Cluster A上执行:# rbd mirror image demote kube/rbdmirror
  • Ceph Cluster A上执行:# rbd mirror image resync kube/rbdmirror

正常failover后的failback步骤如下:

1)Ceph Cluster B,降级主的image

1
2
[root@clusterB-node1 ceph]# rbd mirror image demote kube/rbdmirror
Image demoted to non-primary

2)Ceph Cluster A,升级从的image

1
2
[root@clusterA-node1 ceph]# rbd mirror image promote kube/rbdmirror
Image promoted to primary

3)Ceph Cluster A,检查image的状态为:primary

1
2
3
4
5
6
[root@clusterA-node1 ceph]# rbd mirror image status kube/rbdmirror
rbdmirror:
global_id: df0e8825-1e0a-4559-8a72-6ab30a957366
state: up+stopped
description: local image is primary
last_update: 2019-06-26 11:28:15

4)Ceph Cluster B,检查image mirror的状态为:up+replaying

1
2
3
4
5
6
[root@clusterB-node1 ceph]# rbd mirror image status kube/rbdmirror
rbdmirror:
global_id: df0e8825-1e0a-4559-8a72-6ab30a957366
state: up+replaying
description: replaying, master_position=[object_number=0, tag_tid=10, entry_tid=0], mirror_position=[object_number=3, tag_tid=5, entry_tid=3], entries_behind_master=1
last_update: 2019-06-26 11:29:37

2、单向的RBD Pool级别同步

参考步骤 1、单向的RBD Image级别同步,1)- 5)都完全一致。

6)Ceph Cluster A,配置RBD MIRROR的模式,这里指定使用pool(kube)和模式(image):

1
2
3
4
5
6
7
8
9
>> clusterA
[root@clusterA-node1 ceph]# rbd mirror pool enable kube pool
note: changing mirroring mode from image to pool


然后检查pool的pool模式开启成功:
[root@clusterA-node1 ceph]# rbd mirror pool info kube
Mode: pool
Peers: none

7)Ceph Cluster B,添加RBD MIRROR的peer节点,指定使用的client user:

之前添加过peer节点的话,这一步就不用执行了。

8)Ceph Cluster B,检查pool的RBD MIRROR状态:

1
2
3
4
5
6
7
8
9
10
11
12
13
14
15
16
17
18
19
20
>> clusterB
[root@clusterB-node1 ceph]# rbd ls -p kube
rbdmirror
rbdmirror1


[root@clusterB-node1 ceph]# rbd mirror image status kube/rbdmirror
rbdmirror:
global_id: d55190e2-0e3d-488d-835d-4dc1d312ed78
state: up+replaying
description: replaying, master_position=[object_number=3, tag_tid=2, entry_tid=3], mirror_position=[object_number=3, tag_tid=2, entry_tid=3], entries_behind_master=0
last_update: 2019-06-25 14:25:51


[root@clusterB-node1 ceph]# rbd mirror image status kube/rbdmirror1
rbdmirror1:
global_id: f3e7ea30-6eb8-44ba-9e4a-95a799fa9821
state: up+replaying
description: replaying, master_position=[object_number=3, tag_tid=1, entry_tid=3], mirror_position=[object_number=3, tag_tid=1, entry_tid=3], entries_behind_master=0
last_update: 2019-06-25 14:25:50

注释:只有pool里开启了 journaling feature的images才会同步到从集群!

3、双向的RBD Image级别同步

所谓双向的RBD Image级别同步,其实就是配置 Ceph Cluster A ↔ B 的不同Image的单向同步。

参考步骤 1、单向的RBD Image级别同步,配置相反方向的另一个不同Image的同步即可。

4、双向的RBD Pool级别同步

所谓双向的RBD Pool级别同步,其实就是配置 Ceph Cluster A ↔ B 的不同pools的单向同步。

参考步骤 2、单向的RBD Pool级别同步,配置相反方向的另一个不同pool的同步即可。

四、多个rbd-mirror daemon

在Ceph Luminous之前,每个Ceph Cluster只能启动一个rbd-mirror daemon。

Ceph Luminous版本开始,支持一个Ceph Cluster启动多个rbd-mirror daemon,不过限制只能有一个active状态的rbd-mirror,其他为passive状态。

现在我们用的Ceph Mimic,可以配置多个rbd-mirror daemon,达到高可用性,测试发现多个rbd-mirror同时为active状态!

按照(三)里的步骤启动了rbd-mirror daemon后,ceph status的输出如下:

1
2
3
4
5
6
7
8
9
10
11
12
[root@clusterB-node1 ceph]# ceph -s
cluster:
id: 36ba4a70-47d0-4ea6-8848-c7379bd5066e
health: HEALTH_OK

services:
mon: 3 daemons, quorum clusterB-node3 ,clusterB-node2 ,clusterB-node1
mgr: clusterB-node2(active), standbys: clusterB-node1, clusterB-node2
mds: mycephfs-2/2/2 up {0=clusterB-node2=up:active,1=clusterB-node3=up:active}, 1 up:standby
osd: 36 osds: 36 up, 36 in
rbd-mirror: 1 daemon active >>> 1个active的rbd-mirror
...

按照(三)里的步骤,在clusterB-node2的节点上也启动一个rbd-mirror daemon后,ceph status的输出如下:

1
2
3
4
5
6
7
8
9
10
11
12
[root@clusterB-node2 ceph]# ceph -s
cluster:
id: 36ba4a70-47d0-4ea6-8848-c7379bd5066e
health: HEALTH_OK

services:
mon: 3 daemons, quorum clusterB-node3 ,clusterB-node2 ,clusterB-node1
mgr: clusterB-node2(active), standbys: clusterB-node1, clusterB-node2
mds: mycephfs-2/2/2 up {0=clusterB-node2=up:active,1=clusterB-node3=up:active}, 1 up:standby
osd: 36 osds: 36 up, 36 in
rbd-mirror: 2 daemons active >>> 2个active的rbd-mirror
...

五、遇到的问题

1、RBD Mirroring没有带宽限制

在当前的rbd mirror相关命令里,没有找到对 replication 的速度限制,搜索发现这个feature还在开发中,参考:

https://ceph.com/planet/ceph-and-rbd-mirroring-upcoming-enhancements/

https://trello.com/c/cH1FdRqX/124-rbd-mirror-qos-throttles-for-replication

测试中发现RBD Mirroring能使用较高的专线带宽,可以考虑通过网络层面的限制,比如限制rbd-mirror daemon运行节点的ip带宽!

2、Image的journaling属性,rbd map失败

使用RBD Mirroring的话,需要image都开启journaling feature,但这导致使用rbd map设备失败:

1
2
3
4
5
6
7
8
9
[root@clusterB-node1 ceph]# rbd map kube/rbdmirror
rbd: sysfs write failed
RBD image feature set mismatch. You can disable features unsupported by the kernel with "rbd feature disable kube/rbdmirror journaling".
In some cases useful info is found in syslog - try "dmesg | tail".
rbd: map failed: (6) No such device or address

[root@clusterB-node1 ceph]# dmesg | tail
...
[1891011.411294] rbd: image rbdmirror: image uses unsupported features: 0x40

查询发现现在的rbd kernel module还不支持 image journaling feature,相关的patch有人提了,但是不够完善,没有merge进kernel:https://patchwork.kernel.org/patch/10566989/

若需要通过rbd map方式来访问image,按照如下步骤执行:

1)disable该image的mirror

1
2
[root@clusterB-node1 ceph]# rbd mirror image disable kube/rbdmirror
Mirroring disabled

2)disable该image的journaling属性,然后mount使用

1
2
3
4
5
[root@clusterB-node1 ceph]# rbd feature disable kube/rbdmirror journaling

[root@clusterB-node1 ceph]# rbd map kube/rbdmirror
/dev/rbd0
[root@clusterB-node1 ceph]# mount /dev/rbd0 /mnt/

3、使用rbd-fuse来map image

如上一问题描述,因为image的journaling属性,rbd map会失败,若你不想停止rbd mirroring,然后disable image journaling后再执行rbd map,可以通过另一个途径操作,就是:rbd-fuse

步骤如下:

1
2
3
4
5
6
7
8
9
10
11
12
13
14
15
16
17
18
19
20
21
>> 安装rbd-fuse:
[root@clusterA-node1 ceph]# yum install rbd-fuse

>> mount指定pool的指定image,如果不指定<-r rbdmirror>,会在mount目录里显示pool里的所有images:
[root@clusterA-node1 ceph]# rbd-fuse -p kube -r rbdmirror /mnt/
[root@clusterA-node1 ceph]# cd /mnt/
[root@clusterA-node1 mnt]# ls
rbdmirror

>> mount image,然后使用:
[root@clusterA-node1 mnt]# mkdir /root/tst
[root@clusterA-node1 mnt]# mount /mnt/rbdmirror /root/tst/
[root@clusterA-node1 mnt]# cd /root/tst/
[root@clusterA-node1 tst]# ls
lost+found

>> umount image步骤:
[root@clusterA-node1 ~]# mount | grep rbd-fuse
rbd-fuse on /mnt type fuse.rbd-fuse (rw,nosuid,nodev,relatime,user_id=0,group_id=0)
[root@clusterA-node1 ~]# umount /root/tst/
[root@clusterA-node1 ~]# umount /mnt/
支持原创